


Ice cream is one of those desserts that everyone loves. Creamy, comforting, and refreshing on a hot summer day, it’s hard to say no to. Unfortunately, it’s not known for being healthy. The key components are cream and sugar, so it’s a high calorie treat that you might not indulge in as often as you’d like. And, unlike your favorite baked goods like cookies or brownies, it’s never an easy task to make it yourself.
Until now.
If I told you you can make ice cream with one ingredient, what would you guess that to be? Cream? Nope, not sweet. Sugar? Not creamy. You need both of these components to make a good ice cream right?
Turns out, you can make a healthy, indulgent, creamy ice cream with only one ingredient, and that ingredient is something you may already have on your counter top. It’s not something you’ll likely guess, so I’ll just tell you: Bananas. Yes, you can make creamy and rich tasting ice cream with nothing but bananas. It’s a super easy technique that allows you to make ice cream in as little as the time it takes you to slice and freeze the popular fruit. Once you’ve got the technique down, you can customize it by adding in flavorings, mix-ins, or whatever your heart desires. Since the base is made solely of fruit, you don’t have to feel bad if you add chocolate chips or cover it in caramel sauce. It’s almost as good as visiting your favorite ice cream or gelato shop.
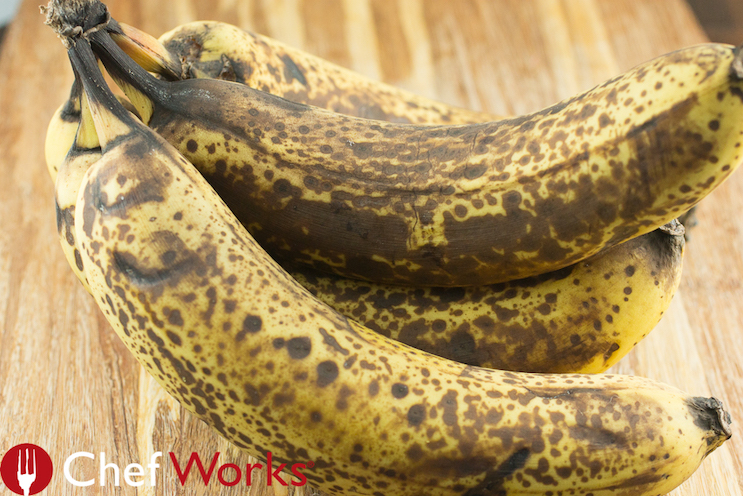
Ingredients. There’s only one main ingredient in this recipe, and chances are you’ve bought bananas before. If you want to really ramp up the health factor of your bananas, you can buy organic, but they aren’t one of the worst pesticide offenders due to their thick skins, so it’s not essential. The only thing to keep in mind is that bananas get sweeter the more ripe they are, so you don’t want to try this with yellow bananas, or worse green ones. Since they tend to ripen pretty quickly, just buy a bunch and let them sit for a couple days. Ideally, they’ll be very heavily spotted black before you freeze them, or even almost completely black. This is a great way to use bananas that you may have forgotten about, and is much more inventive than the typical banana bread most of us default to.
Tips. With simple steps, there’s not much that can go wrong, unless of course you try to rush things. When you pop your bananas in the freezer, they need to be completely frozen solid, or else the heat from processing will turn them into a gooey mess instead of a creamy treat. While you might be able to get away with only a few hours of freezer time, a solid overnight freezer session will yield you much better results.
While you can make this in either a food processor or a blender, a food processor will likely be easier, unless you have a powerful blender. Even so, having made this in both a food processor and my Vitamix, I still found it much better in the food processor simply because the finished produce was easier to get out. Texture wise, it was the same either way, so if all you have is a blender, it will work; just make sure your blender can handle frozen ingredients really well.
Variations. There are so many variations to this, I couldn’t possibly list them all, but I’ll give you a few ideas. First, a splash of vanilla extract will ramp up the flavor, while also toning down the banana flavor. If you’re looking for a chocolate flavored ice cream, try adding cocoa powder in the blending process, but depending on how ripe your bananas are, you may want to add some honey to tone down the bitterness of the cocoa. You can add peanut or almond butter, chocolate chips, nuts, or sprinkles. You can top it with chocolate or caramel sauce, or even warm up some jam for a fruity version.
Have a favorite ice cream flavor in mind? You can try to mimic it with this. For example, mint chocolate chip could be done by adding a few drops of peppermint extract and some chocolate chips. Butter pecan more your thing? Add some butter extract and chopped, toasted pecans. Add fruit, spices, whatever you think would be good with ice cream. Just experiment, and you’ll find something you like, and you won’t have to feel guilty about it.
Serving. No matter what you end up adding to your ice cream, this is best served shortly after making it. Without getting to science-y, the reason is that as it starts to melt, refreezing will just make it too icy, and not in a good way. If you’ve ever made homemade ice cream in an ice cream maker you may have had this same problem. While commercial ice cream does have this problem on occasion, most have stabilizers that prevent this from happening or that cause ice cream to melt more slowly so that you can refreeze without getting that unpleasant icy texture. If you can scoop and get it in the freezer pretty quickly, you may not have this problem, but since it’s only made from bananas, why not just make the amount you know you’ll eat? It’s also easy to portion out: If you typically eat one banana as a snack and feel full, then freeze one banana for your snack. Serving for friends? Simply freeze one large banana per person and you should be fine.
You can serve it like you would any other ice cream. Topped with sprinkles and homemade whipped cream, or dolloped over pie, it literally mimics regular ice cream. The only way that you might not serve it is in a banana split, because that might be just too much banana, but if that sounds good to you, then by all means, try it.
Of course, this isn’t the only way to make homemade ice cream, and if you’re not trying to watch what you eat, there are better ways to indulge in an extra creamy frozen treat. But it’s not as easy, and it’s not as nutritious, and it’s not as aww inspiring either, so even if a healthier ice cream isn’t your thing, I urge you to at least try this once; you may be surprised!
One Ingredient Banana Ice Cream
Prep time: 10 minutes, plus freezing time
Ingredients:
Ripened bananas (use about 1 large banana per person)
Directions:
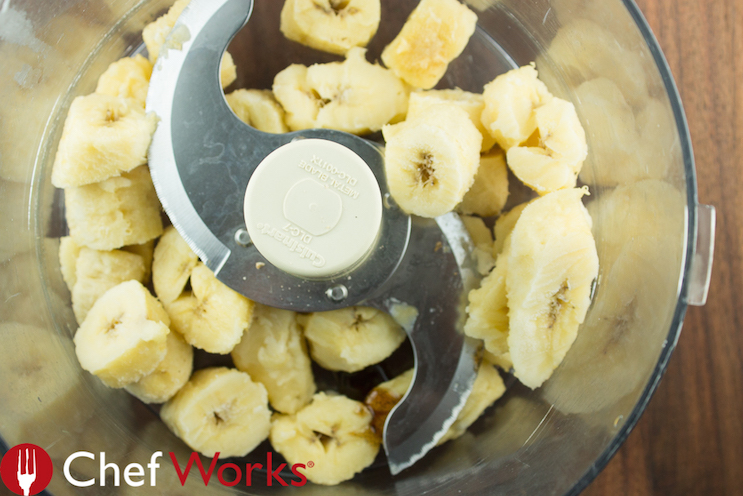
Peel and slice your bananas. Line a baking sheet with parchment paper and lay the bananas on the parchment. Pop in the freezer for several hours — 10 hours or more is best.
When ready to make your ice cream, put the bananas in your blender or food processor.
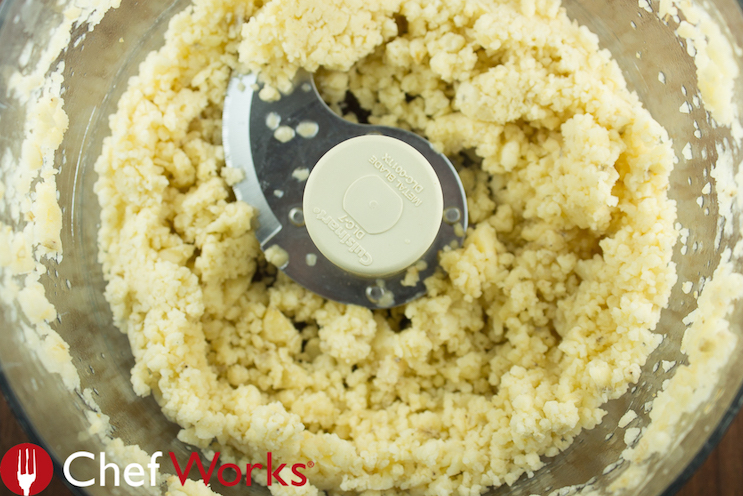
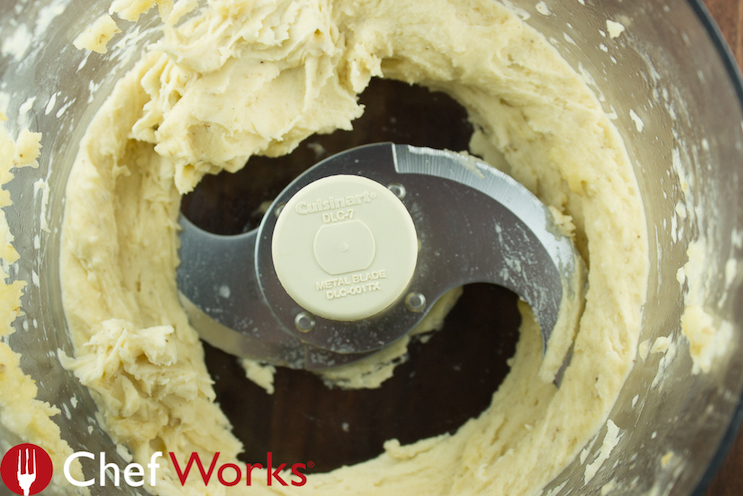
Turn on and blend. It will take a few minutes to break up the bananas, and your food processor may sound like it’s having a hard time, but keep going. Eventually, they will begin to come together and look like ice cream. Don’t over do it. Once it starts to look creamy, stop the processor.
You have two options: you can either eat it now (it will be soft and creamy) or transfer to a freezer safe container and let it firm up a bit (30 minutes or so.) If you take the second option, you want to get it in the freezer asap. Allowing it to melt will make it icy when refrozen. Once you’ve taken it out of the freezer the first time, it’s best to eat it all right away.
Have you ever made ice cream out of frozen bananas? If so, share your experiences!